First Article:
What is "URL rewriting"?
Most sites include variables in their URLs that tell the site what information to be shown to the user. It is something like telling the code to load particular details of item number 7 from a shopping site.
For example, the site may look as in the following:
http://www.cshopping.com/showitem.aspx?itemid=7
The problem with the preceding URL is it cannot be remembered. It is even difficult to read on your mobile. Even the search engines like Google cannot get any information about the content of a page from the URL. What if you wanted to convey that itemid = 7 means a laptop with brand as "DELL"? This is not saying what it should say.
So, what we expect from the preceding URL is it should be easily understandood. Will it not be good if the URL is as below?
http://www.cshopping.com/laptops/Dell/
Now looking at the preceding URL you can easily tell that it is related to laptops and the brand is DELL. So, there is a need to rewrite the URL to be somewhat meaningful and easily conveyable.
How to rewrite URL in ASP.NET?
To rewrite URLs in ASP.NET we are going to use HTTP Modules. HTTP Modules are called before and after the HTTP handler executes. HTTP modules help us to intercept, participate in, or modify each individual request. HTTP Modules implement an IHttpModule interface, which is located in the System.Web namespace. Modules are the ones which handles authentication and authorization of the ASP.NET applications. If you want to implement encryption of the URL string or any custom changes to the application, it can be done by writing our HTTP Module.
Straight to the point, let us create a class in your app_Code directory called "URLRewriter.cs" and add the following code:
- Create a web site using Visual Studio and name it as "URLRewriteTestingApp" and add a class file "URLRewriter.cs".
- Visual Studio will ask whether to create a directory called "App_Code" and place the class file in the folder. Select "OK" to proceed.
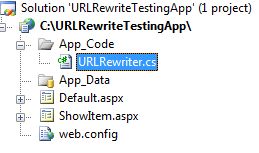
Your solution structure should look something like this:
- Now open the file "URLRewriter.cs" and add the code for HTTP Module as below.
Basically your class must implement the IHttpModule interface to implement its methods. You will see these 2 methods created for you once you implement the interface.
The Init method takes HttpApplication as a parameter. So, you need to create an event handler for the first request of the HttpApplication to handle the request.
Here is your code for the Module:
using System;
using System.Web;
/// <summary>
/// Summary description for URLRewriter
/// </summary>
public class URLRewriter : IHttpModule
{
#region IHttpModule Members
/// <summary>
/// Dispose method for the class
/// If you have any unmanaged resources to be disposed
/// free them or release them in this method
/// </summary>
public void Dispose()
{
//not implementing this method
//for this example
}
/// <summary>
/// Initialization of the http application instance
/// </summary>
/// <param name="context"></param>
public void Init(HttpApplication context)
{
context.BeginRequest += new EventHandler(context_BeginRequest);
}
/// <summary>
/// Event handler of instance begin request
/// </summary>
/// <param name="sender"></param>
/// <param name="e"></param>
void context_BeginRequest(object sender, EventArgs e)
{
//Create an instance of the application that has raised the event
HttpApplication httpApplication = sender as HttpApplication;
//Safety check for the variable httpApplication if it is not null
if (httpApplication != null)
{
//get the request path - request path is something you get in
//the url
string requestPath = httpApplication.Context.Request.Path;
//variable for translation path
string translationPath = "";
//if the request path is /urlrewritetestingapp/laptops/dell/
//it means the site is for DLL
//else if "/urlrewritetestingapp/laptops/hp/"
//it means the site is for HP
//else it is the default path
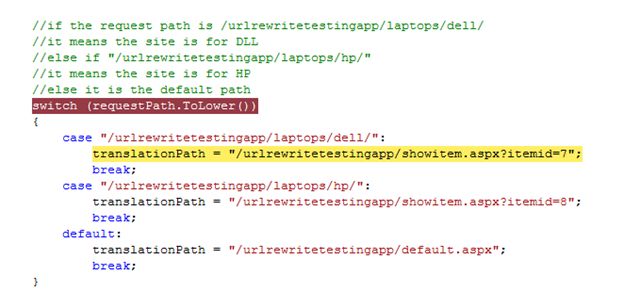
switch (requestPath.ToLower())
{
case "/urlrewritetestingapp/laptops/dell/":
translationPath = "/urlrewritetestingapp/showitem.aspx?itemid=7";
break;
case "/urlrewritetestingapp/laptops/hp/":
translationPath = "/urlrewritetestingapp/showitem.aspx?itemid=8";
break;
default:
translationPath = "/urlrewritetestingapp/default.aspx";
break;
}
//use server transfer to transfer the request to the actual translated path
httpApplication.Context.Server.Transfer(translationPath);
}
}
#endregion
}
4. Now open your default.aspx page in the solution and add the following HTML:
This code is to display two laptop brands HP and DELL.
Note: Since I am not deploying the application in IIS you will see the runtime host created by Visual Studio as localhost:8648. If your application has a different port number or if you have hosted your web application in IIS, you may have to change the values of href in the following HTML.
<%@ Page Language="C#" AutoEventWireup="true" CodeFile="Default.aspx.cs" Inherits="_Default" %>
<!DOCTYPE html PUBLIC "-//W3C//DTD XHTML 1.0 Transitional//EN""http://www.w3.org/TR/xhtml1/DTD/xhtml1-transitional.dtd">
<html xmlns="http://www.w3.org/1999/xhtml">
<head runat="server">
<title>Laptop Brands</title>
</head>
<body>
<form id="form1" runat="server">
<div>
<a href="http://localhost:8648/URLRewriteTestingApp/laptops/Dell/">Dell
</a>
<br/>
<a href="http://localhost:8648/URLRewriteTestingApp/laptops/HP/">HP</a>
</div>
</form>
</body>
</html>
5. Since we are placing references in the HTML code we do not need to do anything in the code behind file. Now add one more webform ShowItem.aspx in the website. This page is to display the actual data that clicking on the hyperlink in the default page should take it to. We are just trying to make the application look simple and so we just display the name of the laptop and a back button.
6. The HTML of the ShowItem.aspx page looks as in the following:
<%@ Page Language="C#" AutoEventWireup="true" CodeFile="ShowItem.aspx.cs" Inherits="ShowItem" %>
<!DOCTYPE html PUBLIC "-//W3C//DTD XHTML 1.0 Transitional//EN" "http://www.w3.org/TR/xhtml1/DTD/xhtml1-transitional.dtd">
<html xmlns="http://www.w3.org/1999/xhtml">
<head runat="server">
<title>Untitled Page</title>
</head>
<body>
<form id="form1" runat="server">
<div>
<asp:Label runat="server" ID="labelShow"></asp:Label>
<br/>
<br/>
<asp:Button runat="server" ID="back" Text="Back"/>
</div>
</form>
</body>
</html>
7. The Code behind file looks as in the following:
The Code behind is to display the text of the laptop and the back button event handler that takes back the user back to the default page.
using System;
public partial class ShowItem : System.Web.UI.Page
{
/// <summary>
/// Page load event for the page
/// </summary>
/// <param name="sender"></param>
/// <param name="e"></param>
protected void Page_Load(object sender, EventArgs e)
{
//read the query string value of itemid that is coming
//from default page when user clicks on the hyperlink
string laptopName = Request.QueryString["itemid"];
//if value is "8" display the text of the label as "HP"
//else display the label as "DELL"
labelShow.Text = laptopName == "8" ? "HP" : "DELL";
//back button event handler
back.Click += new EventHandler(back_Click);
}
/// <summary>
/// Back button click event
/// </summary>
/// <param name="sender"></param>
/// <param name="e"></param>
void back_Click(object sender, EventArgs e)
{
//transfer the page back to default.aspx
Server.Transfer("../default.aspx");
}
}
8. Now we need to configure our custom HttpModule "URLRewriter" in the configuration file to use the module.
<system.web>
<httpModules>
<add name="URLRewriter" type="URLRewriter"/>
</httpModules>
</system.web>
Now our coding is complete and let us test our application by pressing F5 button.
Our default.aspx page:
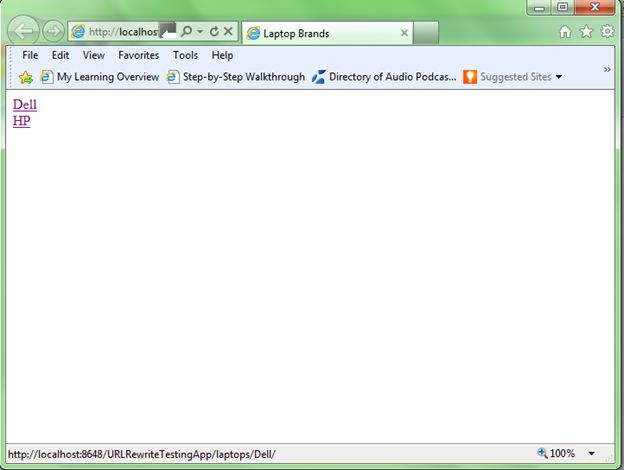
When I place my cursor over Dell, the URL looks like http://localhost:8648/URLRewriteTestingApp/laptops/Dell/ and similarly if you place your cursor on HP, it should look like http://localhost:8648/URLRewriteTestingApp/laptops/HP/ Put break points in your HTTP Module methods and now click on any of the hyperlinks.
I clicked on the Dell and the value at the breakpoint now shows the value of requestPath.
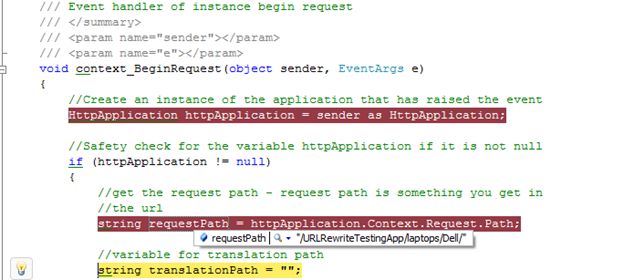
Now the requestPath variable value is "/URLRewriteTestingApp/laptops/Dell/". Our rewriting code must now identify the requestPath and change the path to the actual URL path so that the correct page gets called in the IIS by the engine. So, our translated path will be "/urlrewritetestingapp/showitem.aspx?itemdid=7".
Now the page looks as in the following:
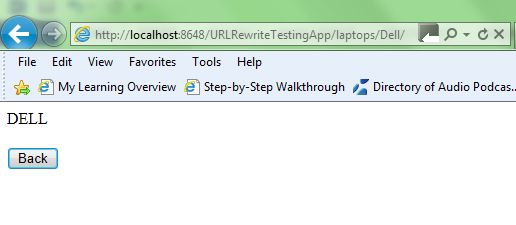
Clicking on the "Back" button will take the user to the default page.
Hope you like this article. If you have multiple URLs to be maintained in your application, it is better to handle the URLs by one dedicated server that processes the requests and redirects the request to the relevant page for processing.
Second Article:
Creating Rewrite Rules for the URL Rewrite Module
March 28, 2014
The URL rewrite module is an extension to IIS which is available as a download for your stand-alone IIS Server, and is also pre-installed on any website on
Windows Azure Web Sites (WAWS) and available
for your use. This walkthrough will guide you through how to create and test a set of rewrite rules for the URL Rewrite Module.
Prerequisites
This walkthrough requires the following prerequisites:
- IIS 7 or above with ASP.NET role service enabled.
- URL Rewrite Module installed. For more information, see Using the URL Rewrite Module.
Setting up a test Web page
To demonstrate how the URL Rewrite Module works, we will use a simple test ASP.NET page. This page reads the Web server variables and outputs their values in the browser.
Copy the following ASP.NET code and put it in the %SystemDrive%\inetpub\wwwroot\ folder in a file called article.aspx:
<%@ Page Language="C#" %>
<!DOCTYPE html PUBLIC "-//W3C//DTD XHTML 1.0 Transitional//EN" "http://www.w3.org/TR/xhtml1/DTD/xhtml1-transitional.dtd">
<html xmlns="http://www.w3.org/1999/xhtml">
<head>
<meta http-equiv="Content-Type" content="text/html; charset=utf-8" />
<title>URL Rewrite Module Test</title>
</head>
<body>
<h1>URL Rewrite Module Test Page</h1>
<table>
<tr>
<th>Server Variable</th>
<th>Value</th>
</tr>
<tr>
<td>Original URL: </td>
<td><%= Request.ServerVariables["HTTP_X_ORIGINAL_URL"] %></td>
</tr>
<tr>
<td>Final URL: </td>
<td><%= Request.ServerVariables["SCRIPT_NAME"] + "?" + Request.ServerVariables["QUERY_STRING"] %></td>
</tr>
</table>
</body>
</html>
After copying this file, browse to http://localhost/article.aspx and check that the page was rendered correctly in a browser.
Creating a rewrite rule
We will create a simple rewrite rule that will rewrite URLs using the following format:
http://localhost/article/342/some-article-title
to:
http://localhost/article.aspx?id=342&title=some-article-title.
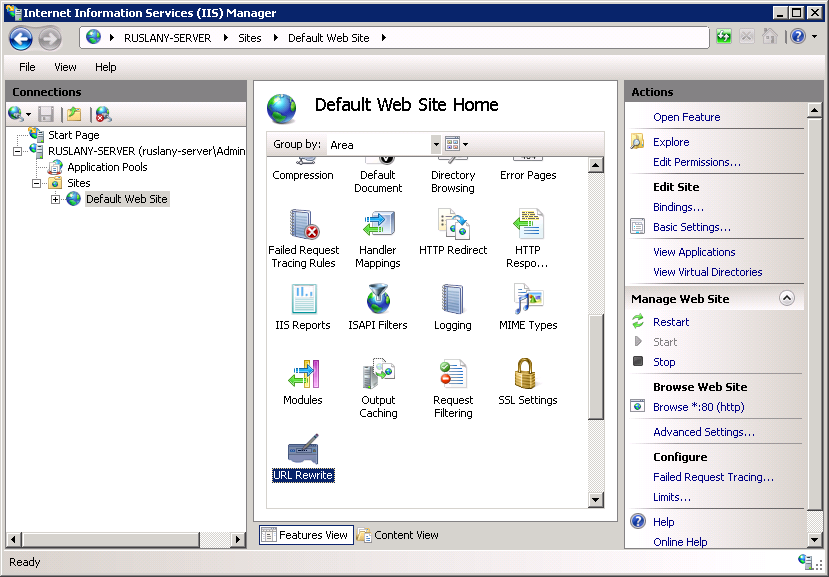
We will create a rewrite rule by using URL Rewrite UI in IIS Manager. To do this, follow these steps:
- Go to IIS Manager.
- Select Default Web Site.
- In the Feature View click URL Rewrite.
- In the Actions pane on the right-hand side, click Add rules…

- In the Add Rules dialog box, select Blank Rule and click OK.

Now you must define the actual rewrite rule. In the URL Rewrite Module, a rewrite rule is defined by specifying four required pieces of information:
- Name of the rule.
- Pattern to use for matching the URL string.
- Optional set of conditions.
- Action to perform if a pattern is matched and whether all conditions checks succeed.
NAMING A RULE
In the Name text box, enter a name that will uniquely identify the rule, for example: ”Rewrite to article.aspx”.
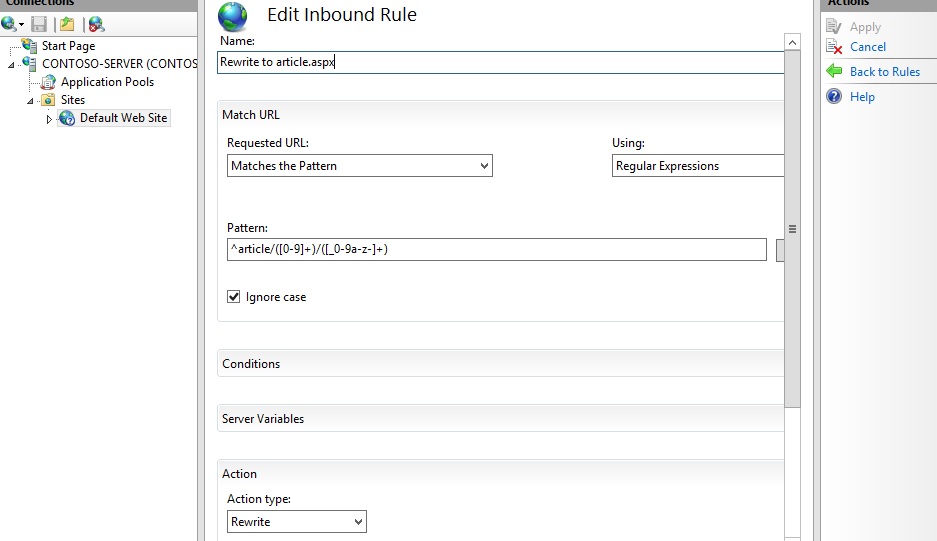
DEFINING A PATTERN
In the Pattern text box, enter the following string:
^article/([0-9]+)/([_0-9a-z-]+)
This string is a regular expression that specifies that the pattern will match any URL string that meets the following conditions:
- Starts with the sequence of characters “article/”.
- Contains one or more numeric characters after the first “/”.
- Contains one or more alphanumeric or “_” or “-” characters after the second “/”.
Notice that certain parts of the regular expression are within parentheses. These parentheses create capture groups, which can be later referenced in the rule by using back-references.
DEFINING AN ACTION
Since the rule that we are creating is supposed to rewrite the URL, choose the Rewrite action type that is listed in the Actiongroup box. In the Rewrite URL: text box, enter the following string:
article.aspx?id={R:1}&title={R:2}
This string specifies the new value to which the input URL should be rewritten. Notice that for the values of the query string parameters we used {R:1} and {R:2}, which are back-references to the capture groups that were defined in the rule pattern by using parentheses.
Leave default values for all other settings. The Edit Inbound Rule property page should look like the following page:
Save the rule by clicking Apply on the right-hand side.
VIEWING THE REWRITE RULE IN CONFIGURATION FILE
The rewrite rules are stored either in the ApplicationHost.config file or in Web.config files. To check the configuration of the rule that we have just created, open a Web.config file located in %SystemDrive%\inetput\wwwroot\. In this file you should see the<rewrite> section that contains this rule definition:
<rewrite>
<rules>
<rule name="Rewrite to article.aspx">
<match url="^article/([0-9]+)/([_0-9a-z-]+)" />
<action type="Rewrite" url="article.aspx?id={R:1}&title={R:2}" />
</rule>
</rules>
</rewrite>
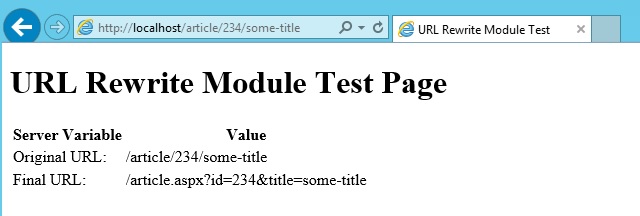
TESTING THE REWRITE RULE
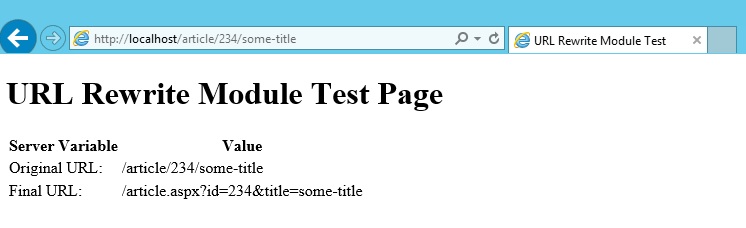
To test that the rule correctly rewrites URLs, open a Web browser and request the following URL:
http://localhost/article/234/some-title
You should see that the rewrite rule on your Web server has changed the original URL to Article.aspx and it has passed “234” and “some-title” as values for query string parameters.
Creating a redirect rule
Now we will create a redirect rule that will redirect all URLs in the following format:
http://localhost/blog/some-other-title/543
to the following format:
http://localhost/article/543/some-other-title
A redirect rule enables more than one URL to point to a single Web page.
To do this, open the URL Rewrite feature view UI in IIS Manager. Click Add Rule(s)…, and then select the Blank Rule template again.
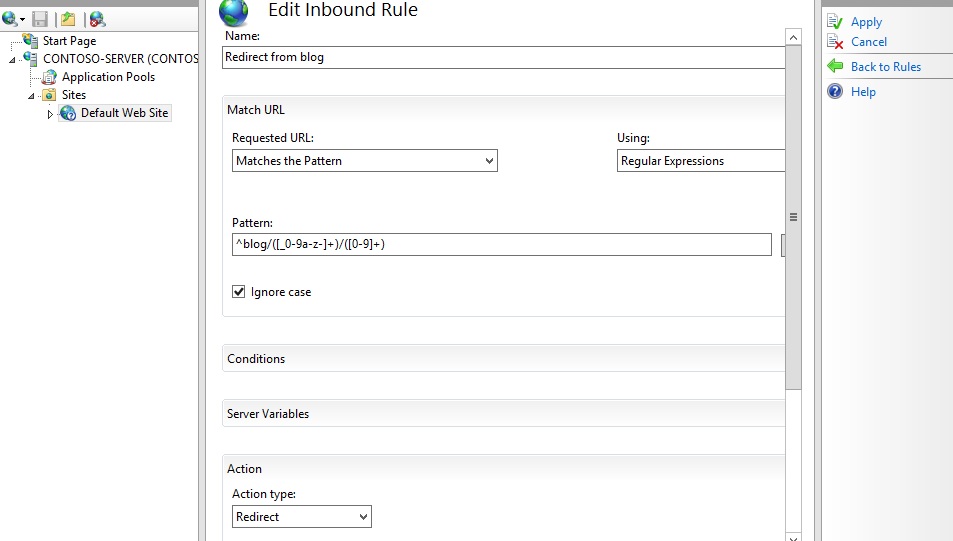
Within the Edit Rule page, enter the following:
- Name: Redirect from blog (This is a unique name for the rule.)
- Pattern: ^blog/([_0-9a-z-]+)/([0-9]+) (This pattern will match the URL string that starts with “blog” and captures the second and third segments of the URL into back-references.)
- Action: Redirect (The redirect action will cause a redirect response to be sent back to the browser.)
- Redirect URL: article/{R:2}/{R:1} (This substitution string will be used as a redirect URL; notice that it uses back-references to preserve and rearrange the original URL pieces captured during pattern match.)
Enter the name, pattern, and action as shown below:
Enter the redirect URL as shown below:
Leave default values for all other settings. Save the rule by clicking Apply on the right-hand side.
TESTING THE REDIRECT RULE
To test that the rule redirects requests correctly, open a Web browser and request the following URL:
http://localhost/blog/some-other-title/323
You should see that the browser was redirected to http://localhost/article/323/some-other-title as a result of redirect rule execution and then the request was rewritten in accordance with the rewrite rule that you have created earlier.
Creating an access block rule
The third rule that we will create is used to block all requests made to a Web site if those requests do not have the host header set. This type of rule is useful when you want to prevent hacking attempts that are made by issuing HTTP requests against the IP address of the server instead of using the host name.
We will create this rule without using IIS Manager. Open the Web.config file in the %SystemDrive%\inetpub\wwwroot\ folder that you used for the article.aspx test file early in this article. Locate the <rewrite> section. Insert the following rule into the <rules> collection, so that it is the first rule in the collection:
<rule name="Fail bad requests">
<match url=".*"/>
<conditions>
<add input="{HTTP_HOST}" pattern="localhost" negate="true" />
</conditions>
<action type="AbortRequest" />
</rule>
The <rewrite> section should look like the following code:
<rewrite>
<rules>
<rule name="Fail bad requests">
<match url=".*"/>
<conditions>
<add input="{HTTP_HOST}" pattern="localhost" negate="true" />
</conditions>
<action type="AbortRequest" />
</rule>
<rule name="Redirect from blog">
<match url="^blog/([_0-9a-z-]+)/([0-9]+)" />
<action type="Redirect" url="article/{R:2}/{R:1}" redirectType="Found" />
</rule>
<rule name="Rewrite to article.aspx">
<match url="^article/([0-9]+)/([_0-9a-z-]+)" />
<action type="Rewrite" url="article.aspx?id={R:1}&title={R:2}" />
</rule>
</rules>
</rewrite>
Let’s analyze the rule to understand what it does.
<match url=".*"/>
The element above says that the rule will match any URL string.
<add input="{HTTP_HOST}" pattern="localhost" negate="true" />
The element above adds a condition to the rule that retrieves the host header value by reading the server variable HTTP_HOST, matches it against the pattern "localhost" and then negates the result of matching. In other words, the condition verifies that the host header does not match "localhost".
<action type="AbortRequest" />
The element above tells the URL Rewrite Module to end the HTTP request.
TESTING THE ACCESS BLOCK RULE
To test this rule, open a Web browser and make a request to http://127.0.0.1/article/234/some-title. What you should see is a browser that does not receive any response from the server. However, if you request http://localhost/article/234/some-title, then the Web server will respond successfully.
The unsuccessful display will be the following:
The successful display will be the following:
Summary
In this walkthrough, you have learned how to configure URL rewrite rules by using IIS manager or by manually editing Web.config files. The rules that were created in this walkthrough demonstrated some of the important features of the URL Rewrite Module, such as regular expressions support and the ability to use HTTP headers and server variables to make rewriting decisions.


 Is your email address OK? You are signed up for our newsletters but your email address is either unconfirmed, or has not been reconfirmed in a long time. Please click here to have a confirmation email sent so we can confirm your email address and start sending you newsletters again. Alternatively, you can update your subscriptions.


